. If it does have entries, you will probably want to delete them. Click on the Add button to create a new route. Click in the Route Type field and type "D" for Default (the text should change). In the Router Address field enter the IP address of the router that was provided by your cable company. Click the Add button. You will notice that it actually created two routes. This is good.
For minimal functionality, this is ALL you need to do!
But who wants minimal functionality?
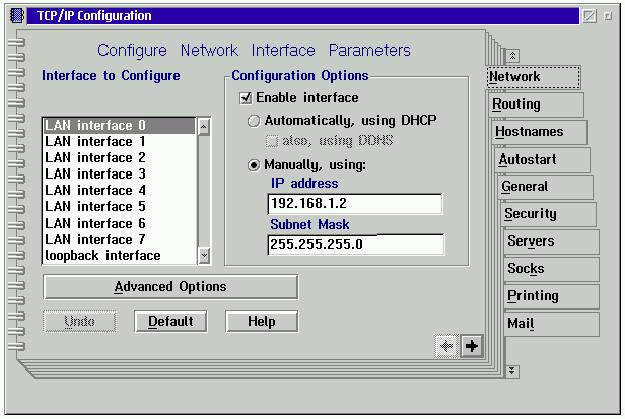
The next step is almost as important as configuring the correct IP address. Select the Hostnames tab of the TCP/IP Configuration Notebook. In the field labelled "This machine's hostname" type the name that was given to you by your cable company that corresponds to the IP address you have. In the Local domain name field type the domain of the address provided. For example, if your machine name is machine1.timbuktu.home.com, then the host name is machine1 and the domain is timbuktu.home.com.
Now click in the Nameserver addresses list box. You do have to click in the list box, otherwise the "Add" button does not get enabled. If you have any existing entries, you may want to delete them - they are probably from your dial-up ISP. Click the Add button. Type in the IP address of the DNS provided by your cable company. If you have multiple DNS addresses repeat the process.
This completes the configuration of TCP/IP itself. You can safely ignore the rest of the tabs on the TCP/IP Configuration Notebook. Close it by double clicking in the upper left corner. If you get a message about allowing it to change your CONFIG.SYS answer Yes. If you get a message about configuring and starting Sendmail for use with Ultimail, make sure you answer NO. Otherwise, you will be hassled with an extra program running every time you start your computer. You will need to shutdown your computer to test the changes you just made.
The rest of the changes necessary involve your Internet applications such as your news and email readers. Change the server name(s), user names, and passwords as appropriate. For mail, you may want to create a new account and keep your old account open for a short time.
If all you want to do is use your single OS/2 machine with your cable modem, you're in business. To verify your changes, shutdown and reboot. Then load your web browser just like normal (except you don't need to start your Internet dialer). Select a website and you should be connected lightning quick.
Two Network Cards! Why?
Many people now have a small network running at home. Wouldn't it be nice to allow the other machines on your network to share this nice fast cable modem? Many cable companies will install an additional connection for an additional monthly fee. But, if you have two network cards in your computer, one can connect to the cable modem and the other can participate in your local network. And your machine can help the other machines communicate over the cable modem with the Internet.
There are really two approaches to this problem. The easiest way is to install something called a proxy server. The Network SIG spent several meetings over the summer looking at different proxy servers. A proxy server works by taking a request, such as for a web page, from one of the machines on your home network, retrieving the page over the cable modem, and then passing it on to the machine that originated the request. The down side to this approach is that it only works for certain protocols such as HTTP (the Web) and FTP. But that is 95% of most people's Internet use. There other proxy solutions available for mail, news, and other functions as well.
The other approach is to use techniques called spoofing, aliasing, or IP masquerading. Basically, the concept is similar except that the machine connected to the cable modem "pretends" to make a request, that is made from one of your home network machines. The software essentially handles the communication back and forth between your home network and the Internet. The downside is that this software is more complex to configure. The benefit is that it should work with virtually any use of the Internet.
Warning: please check your "terms of use agreement" with your cable company. They may specifically disallow the use of either of these technologies. Use at your own risk!
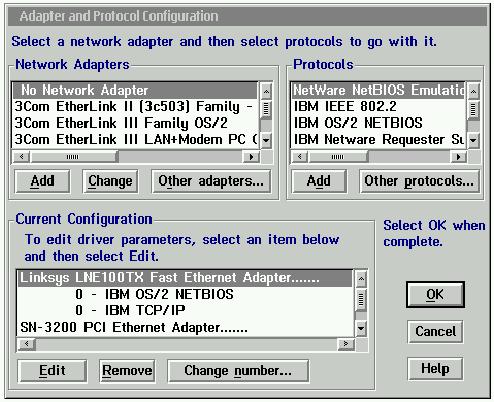
Both of these approaches require installing two network cards in the machine that has the cable modem. This assumes that you've physically installed both network cards and installed the corresponding drivers. I realize that's a mouthful - but it's too difficult to address here.
Open the MPTS configuration program from the System Setup Folder and select the configure buttons until you have the configuration screen. Notice the drivers for both of your network cards listed in the bottom window. Hopefully, each card has TCP/IP listed below it. If it does not, select a driver, then in the upper right corner select TCP/IP, then click Add. Take note of the digit next to the TCP/IP entries. One will be zero and one will be the digit one. For the purposes of this article, let's assume the "0" TCP/IP entry is on the network card for your home network. The "1" TCP/IP entry is the new network card for your cable modem.
Close the MPTS configuration program and save any changes you made. If necessary shutdown and reboot your computer. Now, like before, open the TCP/IP Configuration notebook. Select LAN Interface 0. If it's not already enabled, click on the enable check box. Enter the IP address for your local network. Note that you can't just pick an IP address out of the air. There is a logic to IP addresses and there are certain types of addresses intended for home use. If you need help with this, ASK! You can start by using 192.168.1.1 or 192.168.1.2, etc.
Now select LAN Interface 1 and select the enable check box. From here follow the instructions in the first part of this article. Now proceed to the Routing tab. Verify that the default route still points to your cable modem router.
How it works
Basically, TCP/IP is smart enough to know that your local machines should be accessed with the network card on the local network because their IP addresses are similar. If an address that is not part of your home network is accessed, the default route instructs TCP/IP to send it through the cable modem.
Proxy Servers
Now that we have the hardware and underlying software out of the way we can focus on installing and configuring proxy servers. Under OS/2 you have several choices for proxy servers such as Apache and the Lotus Go Server. Our own Terry Warren has even written a proxy server in Java. Because it is easiest to install and configure we will use the Lotus Go Server formerly known as the IBM Internet Connection Server or ICS.
First download the evaluation version of Lotus Domino Go Web Server from:
http://www.networking.ibm.com/secure/lotusreg.nsf/lgovalidateus
You will need to proceed through several other pages to acknowledge the license, but eventually you will be able to download the web server. The file is seven megabytes, so if you don't have your cable modem setup yet, set aside a little bit of time. If you do have your cable modem, it should only take a minute!
Once you have downloaded the file, run it and indicate a temporary directory as the first parameter. For example:
e462eosu y:\goinst
Change to the directory you extracted to, in this case Y:\GOINST. Then run INSTALL and follow the prompts for installing the software.
To proceed with configuring the server, start it (if it's not already started), as well as your web browser. In your web browser, enter:
http://yourmachinename:8080
Replace yourmachinename with the real name of your machine. The 8080 tells your web browser to connect on port 8080. If everything is working, you should be presented by a web giving several choices. Select the first item, "Administration and Configuration".
Scroll down and select the Proxy Server Settings link. Click on the check boxes for HTTP and FTP (and Gopher if you really want). If you want each proxy request written to a log file, type the name of the log file in the appropriate entry field. Click on the button to accept your changes. If you made any mistakes (such as the path to the log file), they will be reported here. Otherwise you will get a page confirming your changes and allowing you to restart the server to make the changes effective.
Caching
There is another function that is common in proxy servers - caching. The idea is that the server can store commonly retrieved documents or images on it's local hard drive. If a user requests the file, then the server verifies that it's copy is still good and then sends the local copy to the client. Even though a cable modem is fast, there is still some performance benefit from a proxy cache if you can spare a little extra hard drive space. Caching is optional for a proxy server.
To configure caching, select the link to the Caching Settings page. Click the Enable Caching check box. Type in the maximum amount of disk space you want the cache to consume. Specify a directory where the cached files should be stored and a directory in which the cache log files should be kept.
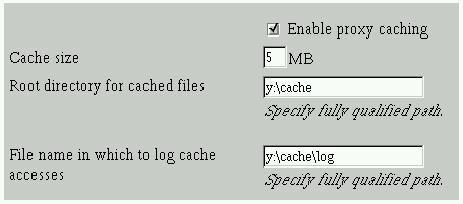
The remaining settings allow you to tailor the cache and it's performance. These settings and other caching setting pages should probably be left alone initially. Go ahead and restart the server so your changes will take effect.
The Browser
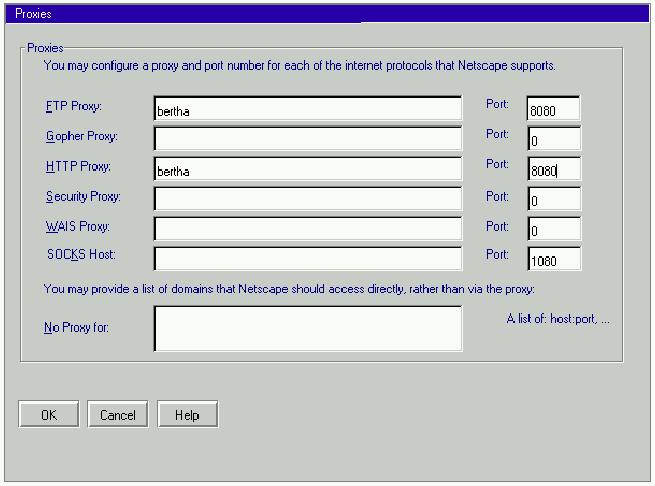
There is one step that is necessary on the web browser to allow it to use your proxy (instead of attempting to contact sites directly). In Netscape, select the Network Preferences menu item from the Options menu. Then select the Proxies tab. Change the radio button to Manual Proxy Configuration and the select the corresponding View button.
In the FTP and HTTP fields type the name of your proxy server. In the corresponding port fields, type 8080 or the port number you selected when installing the proxy server. Click OK on each of the dialogs and you should be in business.
To test your configuration, type in a new URL such as www. scoug.com. You should see activity on your proxy server, and after a brief delay you should receive the web page you requested. Now, select the reload button, and if you enabled caching the page should load significantly quicker.
Review
A large amount of information has been presented in this article, especially if you don't have much experience with TCP/IP. There was some intentional hand waving to try to make the explanations simpler to get you going quicker. If you have problems, questions, or want to learn more, attend the Internet or Network SIGs, or consider posting a message on one of SCOUG's mailing lists.
The Southern California OS/2 User Group
P.O. Box 26904
Santa Ana, CA 92799-6904, USA
Copyright 1998 the Southern California OS/2 User Group. ALL RIGHTS
RESERVED.
SCOUG is a trademark of the Southern California OS/2 User Group.
OS/2, Workplace Shell, and IBM are registered trademarks of International
Business Machines Corporation.
All other trademarks remain the property of their respective owners.