|


SCOUG OS/2 For You - May 1999The "Sundial" SIGDesigning an Address Database Using DBExpertby Sheridan George
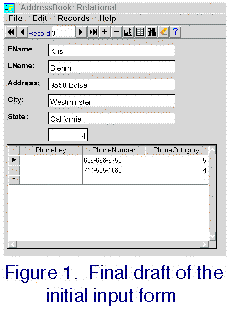
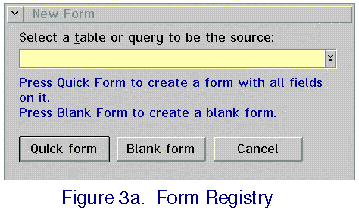
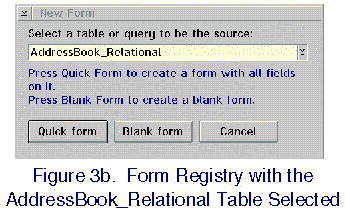
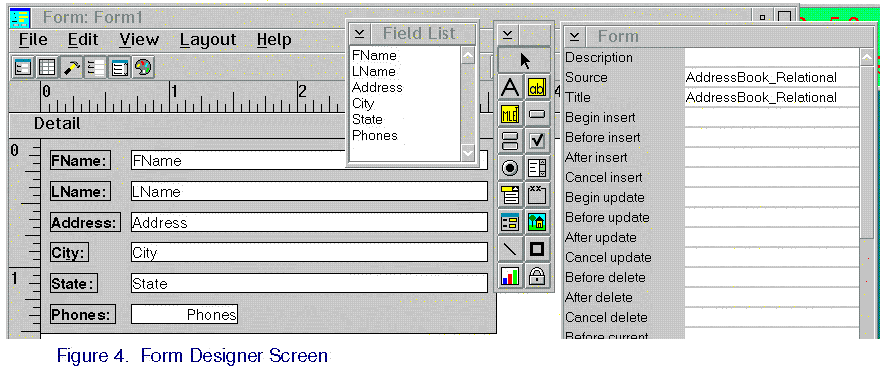
To refresh memories and to bring the new people up to speed, we reviewed what was done last month. We especially wanted to remember how difficult it was to manually add a person to our relational style address book. Keeping two machine generated keys in mind and later inserting them into the Phones table without making an error is difficult. To remedy that problem we built a form to do the "under the covers" work (fig. 1). Forms are created by selecting the Form tab on the Application Notebook (fig. 2) and clicking the New button. This brings up the form registry dialog box (fig. 3a). Forms are generally tied to one table or query. We will be working directly with table AddressBook_Relational so click the arrow at the right end of the text entry box and select AddressBook_Relational from the drop down list. 
There is one other decision to make: whether to make up a form from scratch or let DBExpert do it. We chose to let the program do the form creation. Click on the Quick form button (fig. 3b) to enter the form designer.
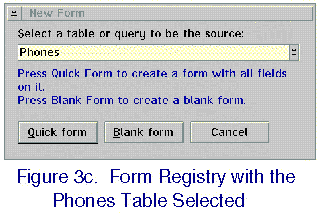
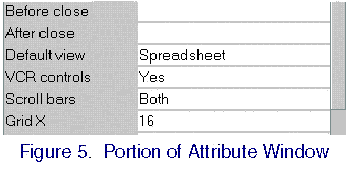
Everything in each record is displayed except the phone numbers. All that can be seen of the phone numbers are the Primary Keys. The reason is the phone numbers are being held in a different table and that table is not registered to this form. A form can be registered to only one table or query. Remember, we are using separate tables to make it easier to connect several numbers to any one person. So how is this problem to be solved? The answer is another form registered to the Phones table. However, in this case the new form will not be stand alone but will be placed inside the current form using a Subform Control. (Get back to the form designer by clicking the fifth icon from the right. It looks like a triangle and ruler.) At the bottom of the grey background drag the border line down about 2 inches. This is done by slowly moving the cursor through the bottom border line until it changes into a double arrow. Then drag with the left mouse button. Now click on the Subform icon in the tool box (it's the third icon up from the left bottom). Move the cursor (it changes to a +) to the left of the form just below the label Phone: and click the left mouse button. Stretch the sub form to fill the form's bottom grey area. Close the form and save it as: InputForm1. Create a new Quick form registering it to table Phones (fig. 3c). This form will be used as is except for one simple but important addition. We want it to display all the phone numbers for any one person at the same time. That can be done by setting the default display to spreadsheet format. In the Attributes window scroll down to where the attribute "Default view" is visible (fig. 5). Click in the white area to the right of Default view and select spreadsheet. Close and save the form as Phone Subform.
These three attributes tell the main form (InputForm1) what form to use as the subform and says connect the main form field Phones to the subform field PhoneKey. That is the same relational connection we used last month in query AddressNPhones. Test the form. It's not elegant yet but it is useful. Notice when you scroll through all of the names all of that person's phone numbers show up in the subform (fig. 1). Come to the May 20th MeetingNext meeting we will add a phone category selector to the main form, clean up the subform, and use the form to add a person and several phone numbers to the database. It might be worth noting that these reports are written in and all screen capture is done by Sundial's Clearlook word processor.
P.O. Box 26904 Santa Ana, CA 92799-6904, USA Copyright 1999 the Southern California OS/2 User Group. ALL RIGHTS RESERVED. SCOUG, Warp Expo West, and Warpfest are trademarks of the Southern California OS/2 User Group.
|
 I'm happy to report that there were 7 people at the SIG meeting in April. One was visiting from North Dakota and we were privileged to have Randell and Carla from Sundial with us. And of course Randell became a working visitor. Thanks, Randell.
 Back in the Application Notebook, click once on InputForm1 and click the Design button (this is how an existing design is changed). When the form designer opens click anyplace in the Subform area. In its Attributes window fill in: