|


SCOUG OS/2 For You - September 1996Seagate Backup for OS/2Arcada Backup is now from Seagate, hence the new name.
When it comes to system requirements, my system is minimal. I attempted to install the software on a 386-40 with 8 megs of ram using a Colorado Memories 250MB and a standard floppy controller as the interface. My first attempt did not work; the software requires a full 6 megs for itself. I used this as a justification to acquire additional RAM (!) and upgraded from 8 to 20 megs. Things are definitely much better now. With plenty of memory, the program successfully installed. However, I ran into another problem creating the Emergency Recovery (ER) Diskettes. I am running a fat file system and my CONFIG.SYS file does not include a path for HPFS.IFS; the program for making the ER disk set aborted when it could not find the HPFS line in my CONFIG.SYS. I didn't like that at all, but then I hadn't read the section in the manual that gives an alternative method to create the ER disks. Not knowing what to do, I sent an e-mail to Seagate's Tech service and they responded that I had to have the HPFS.IFS on my system and they told me the directory where it should be located. After I added this file and changed the CONFIG.SYS to include it, I was able to make the Emergency Recovery Diskettes. When you make the ER diskettes, you need your original OS/2 installation disks. The program copies specific files into a temporary directory to construct your specific set of Emergency Recovery Diskettes. If you are using OS/2 2.1 it will create a four disk set, but with Warp it can do it with only three diskettes. The install program does a two stage install routine. It loads the files creating a new directory and then it prompts you to shut down and when it reboots it creates a folder named Start Here on the desktop. Double-Clicking mouse button 1 will start an introduction to the program. When you exit the Start Here object, the Backup Folder is added to your desktop. Seagate Backup automatically scans for a tape drive when the Backup Folder is created. If a drive is not found, you are prompted to manually configure your drive. Doing a Backup Opening the Backup Folder gives you the following files: Backup Assistant, Restore Assistant, Default Backup Definition, Tape Drive, Scheduler, and a More folder. When you open the More folder you are presented with the New Backup Definition template, Reports, Readme, and an Introduction. All of these objects have very good graphical interfaces.
The file selection dialog lets you easily specify which files to backup - including across drives or over the network. Once you've chosen what to backup, it's time to decide how to do it. You can go with the default or customize the backup options using a settings notebook. You have several compression options including technology from Stac Electronics (so you know it's proven). You can also set options for security, incremental vs differential backup, and which reports are generated when the backup is completed. When you are done, you have a new customized backup object in the Seagate Backup folder. If you want more than one backup scenario, you go through this process again. An alternative to the Backup Assistant is to use the new Backup Definition template located in the More folder. Like any Workplace Shell template, you can drag it to where you want to create another backup definition - so it doesn't have to clutter up your Seagate Backup folder. The template has its own naming dialog, but the end result is that you can call it whatever you want. 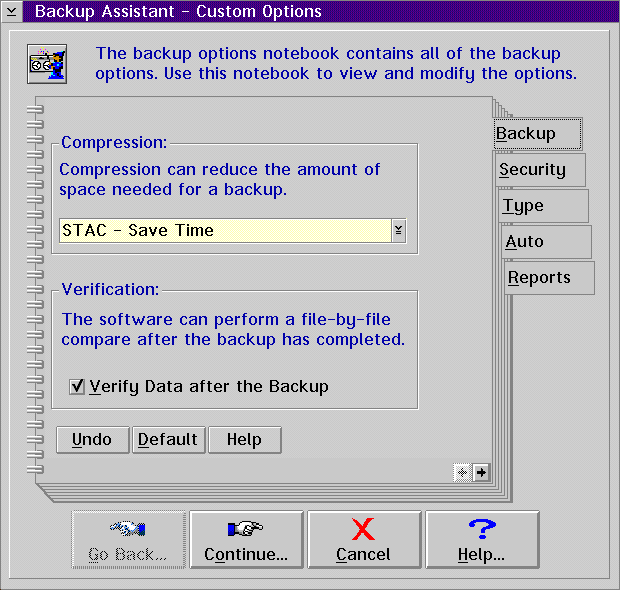
You can easily customize backup features such as security and schedules. Using the template works similarly to the Backup Assistant in that the first thing you'll do is choose what to backup. You can customize the settings also. Thus, the first time you use the program you might want to use the Backup Assistant to get acquainted with the options. After that, the template is the quicker and more natural way to go. To start a backup, simply drag a backup object onto your Tape Device or use the backup option off the popup menu. If you don't want to start the backup right now, you can use the Scheduler Object to schedule your backup at a specific date and time. Once you start a backup, a progress window continually updates information about your backup such as the current compression percentage and elapsed time. 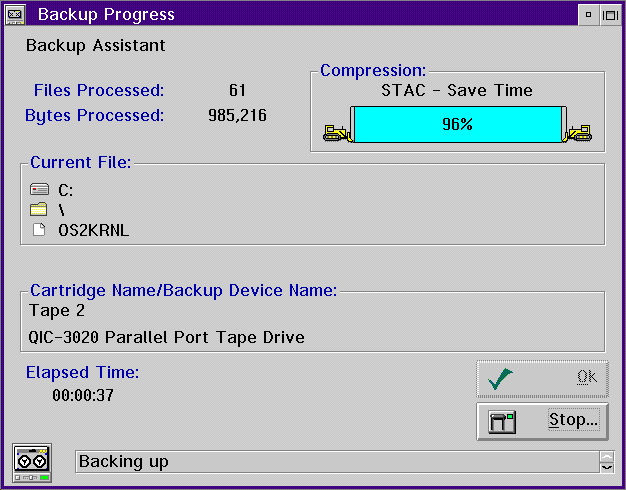
The Progress window provides statistics such as current file, files completed, and elapsed time. Restoring
Everything up to this point has been using graphical interfaces, but if you have just lost everything and you must start from ground ZERO, you must boot from your Emergency Restore Boot disk and restore diskette set; you did make them didn't you! If you followed the directions, you now have the Recovery path to restore your system. The Boot diskette prompts you to insert diskette 1 which has all of the functions available for you to fdisk, format and other tasks as required. If you have to replace your drive, you have all of the utilities to get you going. The only thing I didn't like too much about the Emergency Restore was how the options are displayed. You are presented with options to replace all files, overwrite all files, replace only older files, or never overwrite existing files. In Conclusion The bottom line is that I think the software is very good. However, I have used other tape backup software for DOS that I think provides a better GUI for the restore operations with more selectable options. By the way, when I first tried to load the software and received the insufficient memory message, I checked out the Back Master demo and it worked with my original 8 megs. When you need to restore from zero, the MSR software only requires one boot/restore diskette and provides what I consider to be a much more appealing text based selection screen. Seagate Backup for OS/2 is available in two versions - personal (this review) which supports floppy, EIDE, and parallel port based tape drives and professional which additionally supports SCSI tape drives.
For information, contact Seagate Software, 37 Skyline Drive, Suite 1101, Lake Mary, FL 32746; phone 800-327-2232; FAX 407-333-7730.
P.O. Box 26904 Santa Ana, CA 92799-6904, USA Copyright 1996 the Southern California OS/2 User Group. ALL RIGHTS RESERVED. SCOUG is a trademark of the Southern California OS/2 User Group.
|
 Everyone knows that we should always backup our systems; it isn't if our hard drive will crash, but when! So, when I saw that Arcada Backup was available for review, I decided to try it.
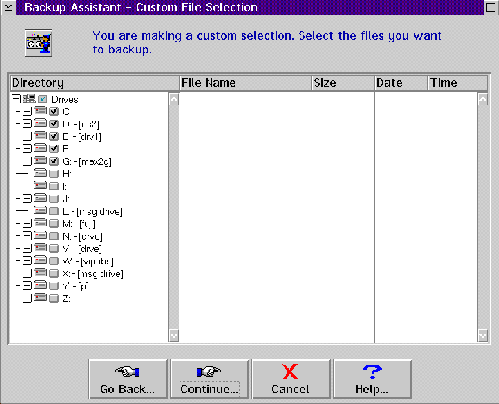
 The Backup Assistant walks you through all of the steps necessary to
define what you want to backup. The first step is to select either all
files or make a custom backup selection. If you select Custom File
Selection, you will be presented with typical drive tree and file listing
for the entire system. Each drive/file has a check box that you can
select or deselect. This makes it easy to choose a combination of files
and drives.
The Backup Assistant walks you through all of the steps necessary to
define what you want to backup. The first step is to select either all
files or make a custom backup selection. If you select Custom File
Selection, you will be presented with typical drive tree and file listing
for the entire system. Each drive/file has a check box that you can
select or deselect. This makes it easy to choose a combination of files
and drives.
 Restoring is easy. The Restore Assistant walks you through a series of
windows containing possible restore selections. You can specify features
such as which backup set on the tape to restore from, which files to
restore, and where to restore to. You can also preview a summary of the
files you've selected to restore. Once you start a restore, a progress
window gives you pertinent information about your restore, just as you got
during the backup.
Restoring is easy. The Restore Assistant walks you through a series of
windows containing possible restore selections. You can specify features
such as which backup set on the tape to restore from, which files to
restore, and where to restore to. You can also preview a summary of the
files you've selected to restore. Once you start a restore, a progress
window gives you pertinent information about your restore, just as you got
during the backup.